THE MAKING OF GH HOUSE: DAYTIME RENDER TUTORIAL FOR SKETCHUP AND V-RAY

Software used: SketchUp, V-Ray
for SketchUp, Photoshop, and Picasa
Note: For educational purposes,
we will be using the ‘GH House’ model by Ronen Bekerman.
The purpose of this tutorial is
to give you some tips and tricks, ideas as well as additional information
pertaining to basic photorealistic rendering using V-Ray for SketchUp. In this
tutorial, I will walk you through the process of rendering and post-production
in order to create an accurate visualization. I did some experiments with the V-Ray
for getting a good render output but was never satisfied with the result. Thus,
I often use some photo-editing software such as Photoshop and Picasa. My
experience and understanding on post-production technique enables me to enhance
the raw render output producing such good quality image. For the knowledge of
everyone, post-production is a process of editing raw images that enable to
enhance the image based on your preferred compositional style output . On the other hand,
rendering is the process that generates an image from 3D scene geometry you
prepare in SketchUp.
In this tutorial, there will be a
three-part discussion highlighting the procedures in rendering as well as post-production
techniques. The first part will focus on SketchUp modelling, which is mainly
the main core for adding texture and entourage to the scene. The second part
will focus mainly on photorealistic rendering of a scene using Vray; this will
include material editing and rendering set-up. On the last part of the
tutorial, we will discuss the different post-production techniques using Photoshop
and Picasa.
SKETCHUP
 |
STEP 1: Open your SketchUp model.
Here is the ‘GH House’ model as a sample. Set the view in perspective mode. Adjust
your scene to ‘Shaded with texture’ with shadows
turned on.
|
 |
STEP 2: Import the following
images in SketchUp. To do that, click File>import>select the image texture(s)>
press Enter. You need to explode the imported images before you apply the
texture(s) to your model. Some textures are available in the ‘Paint Bucket’
tool.
|
 |
| STEP 3: Apply the following textures in your SketchUp model. |
 |
STEP 4: Insert 2D entourage in
the scene.
|
 |
STEP 5: Insert 3D entourage in
the scene. The following entourage can be downloaded
in 3Dwarehouse (the official repository website of all SketchUp users).
|
 |
STEP 6: Set the ‘Camera’ in ‘Two-point perspective’ mode. This will
enable us to avoid distortion when we start the rendering procedure.
|
 |
STEP 7: After finding your preferred perspective view. Save your scene:
view> animation> add scene. Creating a scene in SketchUp enables you to
capture a state of model, thus you can go back to the same view and settings
when needed.
|
VRAY
One of the most important steps in photorealistic rendering is applying
the right materials to the model as it gives vibrancy to the whole scene. Some
Vismat (V-Ray materials) are downloadable via internet. Here, I will
show you the materials setting I used in this model.
STEP 1: Edit the following materials in ‘V-ray material editor’
(1) Pool Water
 |
Pool water reflection settings
|
 |
Pool water maps settings
|
 |
Pool water bump map
|
(2) Glass
 |
Glass reflection settings
|
(3) Wood Deck
 |
Wood deck reflection settings
|
 |
Wood decks diffuse and map settings
|
STEP 2: Adjust the V-Ray render settings. This setting is based on the
‘default setting, I just slightly change some parameters.
(1) Environment Settings
 |
Follow the settings for the GI (Skylight). Here, the idea is to replace
the V-Ray sun with HDRI from the GI (skylight) option. The HDRI will serve as the light source or sun. This will enable us to produce soft shadows. Adjust the value of intensity to 7.
|
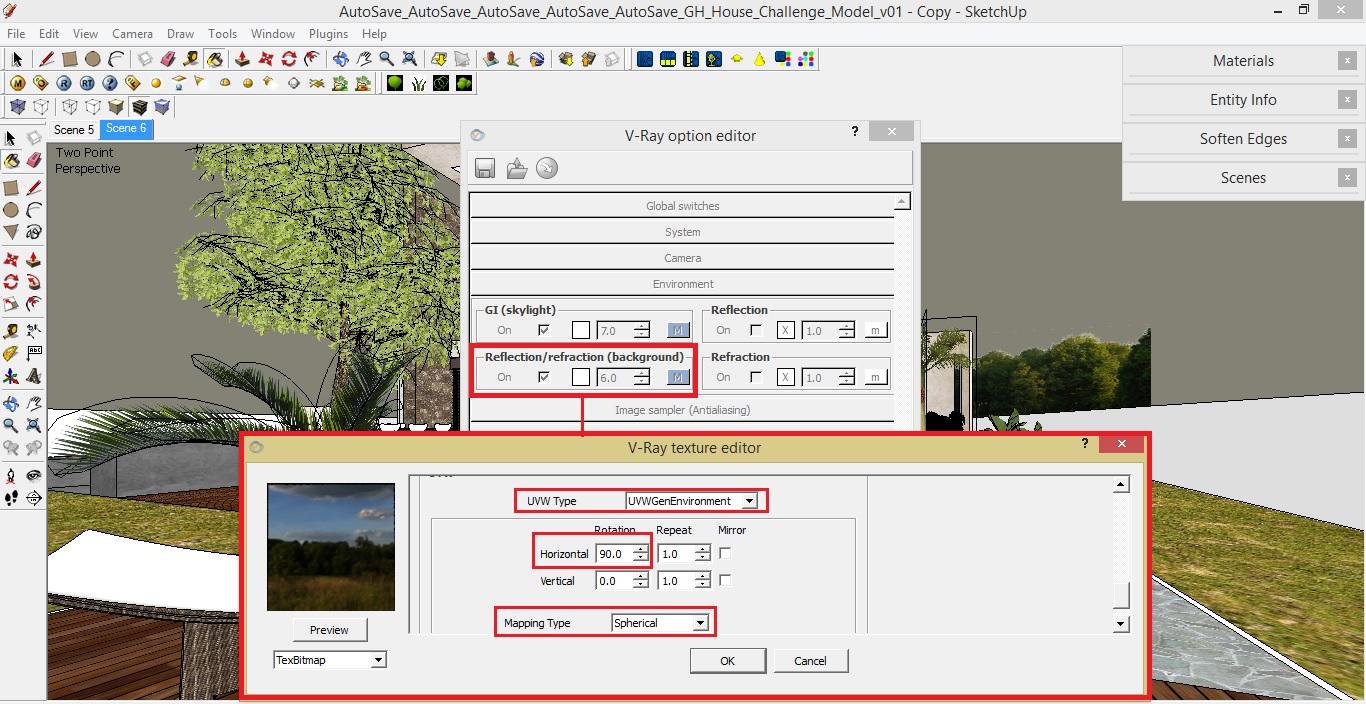 |
Follow the settings for the ‘Background’. Here I used the same HDRI
image from the GI skylight. Rotate the angle of the sky to 90 degrees. Adjust the value
of intensity to 6.
|
 |
HDRI Sky preview
|
(2) Camera
settings
 |
Adjust the value of ‘Film speed’ and ‘Zoom factor’. The ‘Film speed’
technically affects the brightness and softness of the render output, thus the
greater the value of the film speed the brighter the image will occur.
|
(3) Output
settings
 |
For the final render, adjust the resolution to 2560x2560.
But, if you’re doing a test render, it would be better to start with low
resolution first before adjusting to higher resolution.
|
STEP 3: Click the render button
|
 |
Render time: 1 Hour and 9 minutes
|
 |
Raw render image result using
V-Ray
|
POST-PRODUCTION
This is my workflow in post-production and I use both Photoshop and
Picasa to enhance my rendered image.
 |
STEP 1: Using Photoshop, insert
the entourage in your raw rendered image. To do that, open
the tree branch entourage image in Photoshop> drag the image to your scene
using ‘move tool’> place the entourage at the upper right corner> fit the
entourage image using transform command (press Ctrl+T)> change the image
view if needed (horizontal or vertical). Then save in JPEG Format.
|
 |
Tree Branch Entourage
|
 |
Result so far
|
STEP 2: Open your last image in Picasa and follow the workflow
 |
(1)
Set to Orton
mode
|
 |
(2)
Sharpen the
image
|
 |
| (3) Apply Glow effect |
 |
| (4) Select ‘I’m feeling lucky’ |
 |
(5)
Save in JPEG
format
|
 |
Result so far using Picasa
|
STEP 3: Going back to Photoshop, open the last edited image and follow
the workflow.
 |
(1)
Adjust the
‘Color balance’
|
 |
(2)
Adjust the
‘Vibrance’
|
 |
(3)
Adjust the
’Hue and saturation’
|
 |
(4)
Adjust the
‘curves’
|
 |
(5) Adding Vignette on your image
adds drama and makes the house model more accentuated. To do that, duplicate the background (go to background layer> right click> click ‘duplicate’). Place the background copy at the top layer. Set the blend
mode to multiply with 65% opacity. Using the ‘eraser’ tool remove the darker
spot in the upper and middle portion of the image.
|
As optional, you can hit CTRL+M (curve) again if you want to
adjust the brightness and contrast of your image or go back to your layer and
adjust the settings. I just want to remind you that the post-production settings
may vary depending on your raw render image output.
 |
| FINAL RENDER OUTPUT |
Thanks for taking the time to read the tutorial; I hope you will find it helpful to your future projects and presentation.
This is a really great information transfer. really thank you so much. Can I ask you to share the model?
ReplyDeleteThank you! here's site for the model. link: https://www.ronenbekerman.com/past-challenges/architectural-visualization-challenge-i-the-gh-house/
DeleteThis comment has been removed by the author.
ReplyDeleteVery good* pls can you write out the general setting for the pool water, It's not clear to read!
ReplyDeleteThis is really great. Thank you. But can I ask where can I get those HDRI for free ?
ReplyDeletehttp://hdri-skies.com/
Deletehttps://www.hdri-hub.com/hdrishop/freesamples/freehdri
DeleteI really enjoy reading and also appreciate your work. house rendering melbourne
ReplyDelete