
Lawn is one of the basic elements
in garden designs which compose of grass and ground cover plants. In landscape and architectural
visualization that specialized computer generated graphics (CGI), the most
common way of rendering a lawn or ground cover area is trough optimizing the
grass texture by applying bump map and maximize the setting, so that the ground
will not appear completely flat. On the other hand, some visualizer would
prefer to render the lawn in more realistic and detailed manner by adding
three-dimensional (3-D) grass and scattering it on the ground surface. However, rendering a full 3-D
grass object may increase the render time as well as the file size of the
project. Thus, introducing such proxy grass, instancing, and other rendering
features from different plugins help reduce the render time. There are various ways to
generate grass and render it inside SketchUp. In this article, we will
explore the various methods on how to generate 3D grass in SketchUp using different
plugins, showing the basic step-by-step tutorials. Also, for your reference, I will provide a comparative
analysis regarding the different plugins for SketchUp that specialize in making 3D grass. Here, I will indicate the set-up time and render time for each plugins in
order to evaluate which plugin(s) shows a better performance.
For this test render experiment, I will be using
the following plugins for SketchUp, emphasizing the 3-D grass feature: (1) V-Ray
3.4- proxy grass, (2) Skatter plugin, (3) Kerkythea- Instacing, (4) 3D Tree
Maker plugin, (5) Make Fur plugin.
1. Vray
3.4 (Proxy Grass)
 |
STEP 1: Open the SketchUp,
Using the ‘Rectangle’ tool, draw a ground plane model with 1x1 meter size then
apply a vegetation texture on the surface.
|
 |
STEP 2: Open the SketchUp
file with 3-D grass model> select the entire grass model> right click>
select ‘Make Group’.
|
 |
STEP 3: Select the grouped
3-D grass model> using V-Ray toolbar, click ‘Export Proxy’> type your
preferred file name> click ‘Save’.
|
 |
STEP 4: Going back to
ground plane model, click ‘Import Proxy’ under V-Ray toolbar option> select
the last saved vrmesh file> then click ‘Open’.
|
 |
STEP 5: Place the proxy
grass on the ground plane.
|
 |
| STEP
6: Run a test render, notice that when you import your model into V-Ray proxy, all
the assigned materials from the original model was gone. Take note that V-Ray
proxies do not store the materials from the model, only the geometry and the
material ID or assigned materials are stored. |
 |
STEP 7: In order to load
the grass materials from V-Ray proxy, go to ‘V-Ray Asset Editor’> under
‘Materials’, select the V-Ray grass materials.
|
 |
STEP 8: Under ‘Diffuse’,
load the material from ‘Bitmap’ option> then select your preferred grass material
from your folder> then click ‘Open’.
|
 |
| STEP
9: Copy the proxy grass. Fill the ground with proxy grass. When done, hit the V-Ray
render button. |
2. Skatter
 |
STEP 1: Open the SketchUp,
Using the ‘Rectangle’ tool, draw a ground plane model with 1x1 meter size then
apply a vegetation texture on the surface. Plane surface should be oriented in
front face. Set the ground plane into ‘Group’ or ‘Component’. NOTE: Skatter plugin
can only work with groups and components. Thus, make sure that the surfaces and
areas have to be grouped.
|
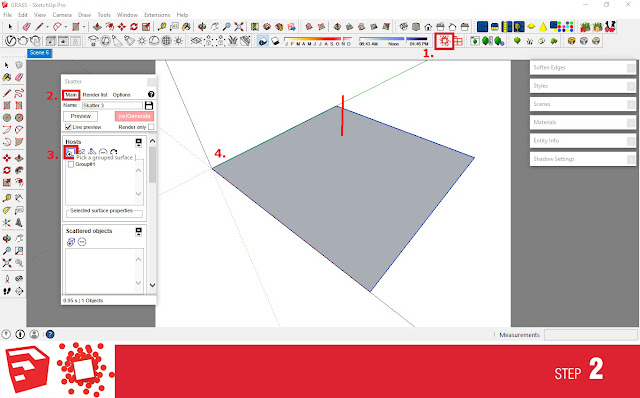 |
| STEP
2: Using the Skatter plugin, click ‘Launch Skatter’> go to ‘Main’> under
‘Hosts’, click ‘Pick a grouped surface’> then select the grouped ground
plane model. When done, a red mark will appear on the surface of the plane
model in order to indicate the area where the ‘Skattered objects’ will emerge
during the rendering process. |
 |
STEP 3: Using the Skatter
plugin, open the ‘Skatter Library’> then choose any available grass
materials from the menu. Here, we choose ‘Cut grass 01 (large)’.
|
 |
STEP 4: Choose your
preferred settings for the ‘Skattered objects’: (1) Default: Proxies and Render
only, (2) Proxies, (3) Full geometry and render only, (4) Full geometry
|
 |
STEP 5: Click the ground
plane surface> wait for the ‘Skattered objects’ to generate.
|
 |
RESULT SO FAR: ‘Skattered
objects’ in different settings.
|
 |
STEP 6: In order to re-surface
the ‘Skattered objects’ from the plane, just click ‘Regenerate’ from the
Skatter ‘Main’ menu. NOTE: There is no need to click ‘Regenerate’ if the
‘Skattered objects’ is loaded in ‘Full geometry’.
|
 |
STEP 7: Click the render
button using any available render plugins inside SketchUp. NOTE: During the rendering
process, the ‘Skatter for SketchUp’ Version 1.4 in proxy settings can only works
in the following render plugins: Vray, Thea, Maxwell, and Enscape. However, if
you load the ‘Skatter objects’ in ‘Full geometry’, the objects can be rendered
in any available rendering plugins for SketchUp.
|
 |
RENDER RESULT
|
3. Kerkythea (Instancing Brush)
 |
STEP 1: Open the SketchUp,
Using the ‘Rectangle’ tool, draw a ground plane model with 1x1 meter size then
apply a vegetation texture on the surface.
|
 |
STEP 2: Open the SketchUp
file with 3-D grass model > select the entire grass model> right
click> select ‘Make Group’. Copy (ctrl+c) the selected grass model.
|
 |
| STEP
3: Going back to ground plane model, paste the grass model on the plane
surface. |
 |
STEP 4: Using Kerkythea
toolbar, click ‘Export model to Kerkythea’> under ‘Export options’, click
‘Ok’
|
 |
STEP 5: Choose a file
location where you want to save your kerkythea file, type your preferred file
name> then click ‘Save’. NOTE: Your model will be saved as .xml file.
|
 |
STEP 6: Open the Kerkythea
program> under ‘File’, click ‘Open’. Under ‘Open Scene’, select your last
saved .xml file then click ‘Ok’.
|
 |
STEP 7: Under ‘Models’,
select all the grass materials> right click> click ‘Group’> then enter
your preferred name. Here, I will be naming it as “Grass”. NOTE: We need to
organize all the materials present in a particular model in order to easily
select and unselect the materials when needed, especially when performing such
kerkythea ’instancing brush’.
|
 |
STEP 8: Under ‘Tools’,
click ‘Instancing brush’. Here, a dialogue box for ‘Instancing brush’ will
appear.
|
 |
STEP 9: Under ‘Models’,
right click on the “Grass” labeled material, then click ‘Select’. NOTE: The
selected materials will be labeled with ‘Star’. Next, under ‘Instancing brush’
dialogue box, click ‘Instance’.
|
 |
STEP 10: Go to ‘Models’,
right click on the “Grass” labeled material, then click ‘Unselect’. Notice the
labeled star will disappear.
|
 |
STEP 11: Under ‘Models’,
right click on the “Groundcover” material from the model, then click ‘Select’.
NOTE: The selected materials will be labeled with ‘Star’. Next, under
‘Instancing brush’ dialogue box, click ‘Canvas’.
|
 |
STEP 12: Change some parameters
inside ‘Instancing brush’ dialogue box. Here, change the distance from 1.0
(default) to .01 canvas. This will enable us to populate the grass evenly in a
small ground plane model.
|
 |
| STEP
13: In order to generate the grass, you can choose any operation from the
‘Instancing brush’ dialogue box such as ‘Populate’ or ‘Brush’. When you
choose the ‘Populate’ option, the object will automatically multiply in random fashion, populating the surface of the selected canvas with grass object. On
the other hand, when you choose the ‘Brush’ tool, you will need to
manually apply the tool in the surface in order to populate the area with the
grass object. In order to delete the excess object from the plane, you can use
the ‘Eraser’ tool. As for now, we will be using the ‘Populate’ operation. |
 |
STEP 14: Click the ‘Render
Start’ button. When done, click the ‘Rendered image’ icon, then save the file
as JPEG or PNG.
|
 |
RENDER RESULT
|
4. 3D Tree Maker
 |
STEP 1: Open the SketchUp,
Using the ‘Rectangle’ tool, draw a ground plane model with 1x1 meter size. Apply
a vegetation texture on the surface then select the ground surface. This will
serves as a base for our grass model from ‘3D Tree Maker’ plugin.
|
 |
STEP 2: Using ‘3D Tree
Maker’ toolbar, click ‘Make grass’. A dialogue box will pop-up on your screen.
|
 |
| STEP
3: Under ‘3D Tree Maker- Make Grass’ dialogue box, choose your preferred plants
or tree type. Here, we will be using the ‘grass00: Default Generic Grass’. Then
select the surface of the ground plane model. When done, click ‘Place
Instances’. This however will generate proxy grass on the ground plane. In
order to produce denser grass, just click ‘Place Instances’ more than twice. NOTE:
If you want to instantly generate a 3D grass in high-poly without going through
a proxy settings, just uncheck the box from ‘Make proxies’ then click ‘Place
Instances’. |
 |
RESULT SO FAR
|
 |
| STEP
4: In order to generate the 3-D grass from a proxy model, go to ‘3D Tree Maker’
toolbar, then click the ‘Redraw’ option. When done, click the render button
using any available render plugins inside your SketchUp. Here, we will be using
V-Ray for SketchUp. |
 |
RENDER RESULT
|
5. Make Fur
 |
STEP 1: Open the SketchUp,
Using the ‘Rectangle’ tool, draw a ground plane model with 1x1 meter size.
Apply appropriate texture from the ‘Material dialogue box’. NOTE: When using
‘Make Fur’ plugin, all the materials applied in the ground plane model will
automatically assigned to the grass model generated by the plugin. In order to
generate the grass using ‘Make fur’ in proper orientation, make sure that the
ground plane is set into front face (white face). To do that, select the plane
model> right click> click ‘Reverse Faces’.
|
 |
STEP 2: Select the ground
plane model> open ‘Make Fur’ (Dialogue box or input box).
|
 |
| STEP
3: Under ‘Fur Settings’, change the value of ‘Rootwidth’ to 0.010 meter (10mm). |
 |
STEP 4: In order to
generate the grass, select the surface of the ground plane model, then click
‘Make Fur’ or ‘Ok’. NOTE: In order to produce such denser grass, just click ‘Make
Fur’, more than twice.
|
 |
RESULT SO FAR
|
 |
STEP 5: Click the render
button using any available render plugins inside your SketchUp. Here, we will
be using V-Ray for SketchUp.STEP 5: Click the render
button using any available render plugins inside your SketchUp. Here, we will
be using V-Ray for SketchUp.
|
 |
RENDER RESULT
|
SUMMARY
OF DIFFERENT RENDERED GRASS, GENERATED USING DIFFERENT PLUGINS FOR SKETCHUP
SAMPLE RENDER
 |
| Workflow: SketchUp+Skatter+Vray+PS+Picasa |
 |
| Workflow: SketchUp+Skatter+Vray |
Thank you for reading.


Its very informative knowledge base. You can now get hands on online services for 3D Architectural Renderings that too with 20% discount on all services. Visit here- | 3d architectural walkthrough services
ReplyDeleteReally, nice post. It is very useful. Thanks for sharing. Please visit and use! And get information about when to aerate lawn australia
ReplyDelete